I handle a ton of photos… like a ton. Between my blog photos, travel photos, work photos I have to have a good photo workflow in order to get my work done and to keep them organized! I get asked a million times how I handle my photos and what tools I use, so I figured I’d do a post on my photo workflow. This photo workflow works for me personally and might not be for everyone, but I think it’s a great workflow especially those that are bloggers or those that are always on the go.
Let’s use the scenario for my blog photos. I take all my photos on my DSLR and always make sure I have enough room to take tons of photos! Here are the next steps for my workflow! LET’S DIVE IN!
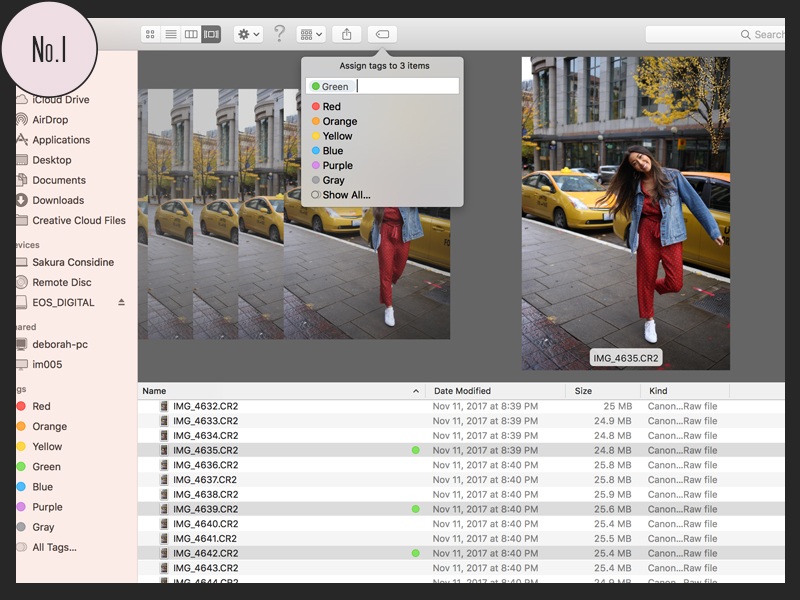
#1 – SORT + TAG
First thing I do is put my memory card in with all of the unedited photos I just took and literally go image by image tagging each file I like with a specific color.
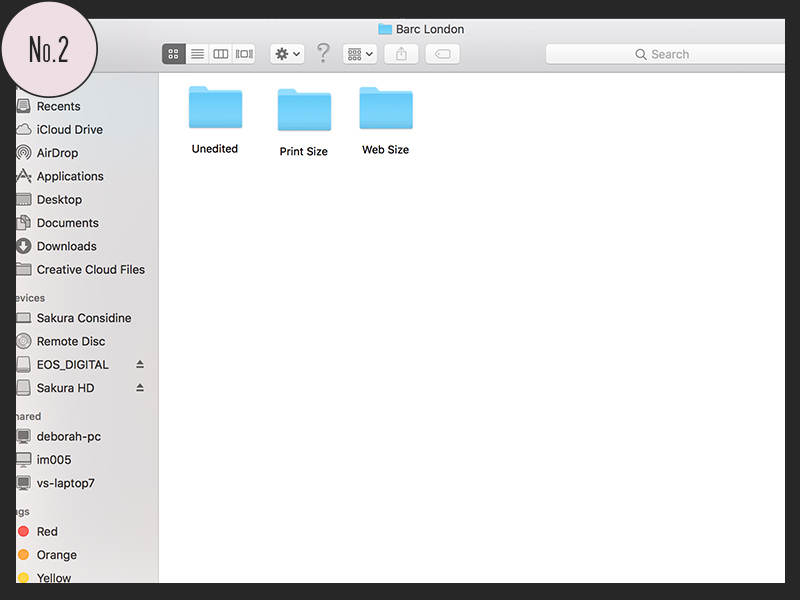
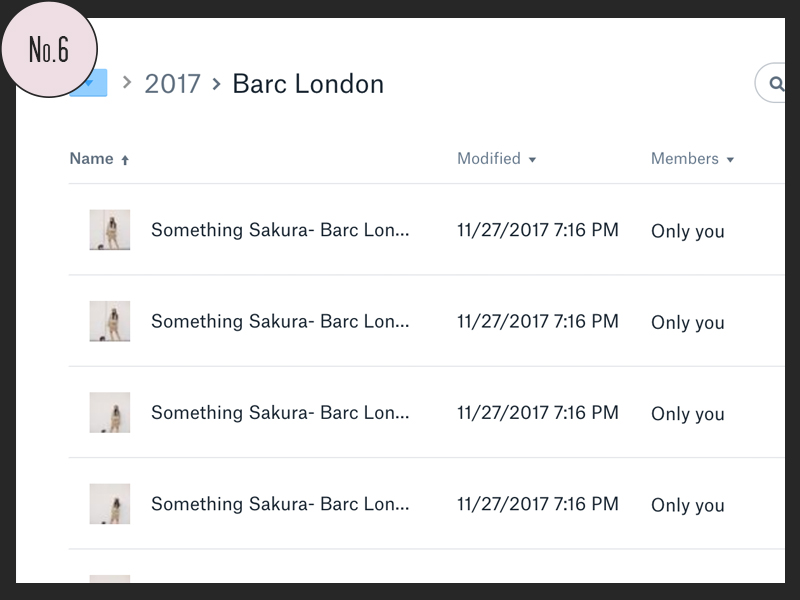
#2 – CREATE FOLDERS FOR YOUR SHOOT IN YOUR HD
Okay, so first things first. You NEED a hard drive (here’s the link to the one I use). I carry my hd everywhere I go- literally, every where I go just in case. I organize my hard drive by Photos > Year > Photo Category (ex: blog, client, etc.) > Shoot Name. Then within the specific shoot folder I always create THREE important folders: 1. Unedited, 2. Print Size, 3. Web Size.
#3 – TRANSFER UNEDITED COLOR TAGGED PHOTOS TO HD
Now that you have your folders ready, next step is to transfer your photos that you just tagged and filter your finder window by TAGS then you will find all of the photos you just sorted all together and you now can just click and drag all of your photos into that unedited folder you just created!
#4 – EDIT IN LIGHTROOM
I won’t go into the details of my editing technique in Lightroom, but I then import ALL of the photos from my unedited photo on my hd into Lightroom and edit those photos. I will only take something into Photoshop is necessary (need to clone something out, fix something in the image that Lr cannot do) after Lightroom. If you don’t have Lightroom, you should definitely get the monthly Photography Plan for only $10/month! Click here to sign up!
#5 – EXPORT PRINT + WEB SIZE PHOTOS IN THE HD
I then export the edited photos twice from Lightroom to my hd into the folders I created in step #2. First round of export is the original size in resolution 300pxl (print size) then the second round is for the web size which I resize to my blog size dimension and 120pxl resolution (72pxl is fine, but I personally like to have it slightly bigger just in case).
** I like to always keep both size options because you should never import a large file onto your blog or website because it will slow your site down and it’s just not necessary BUT you do need print size in case you ever want to print it in the future!
#6 – UPLOAD EDITED WEB SIZE PHOTOS IN DROPBOX
First let me explain why I like to use dropbox. The biggest reason why I upload my edited photos in dropbox is, so when I’m on the go, I can easily find all of my photos from my phone on the dropbox app to be able to Instagram any photo any time, anywhere! So this step is very, very important in my photo process! I have my dropbox organized the same way I have my hd folders organized. So yup, next step is to upload my web size photos in dropbox!
That’s pretty much it for my photo workflow! I hope this helps many of you and this is the best photo workflow that has worked for me after all these years. Feel free to comment below with any questions you have! xx